1) Categories for the site posts:
News, Entertainment, Culture, Opinion, Photos, Science, Sports, Education, Multimedia, Video.
Note: Featured Slide is the category you should select for any stories that you wish to feature on the home page in the top carousel.
2) Posts vs. Pages
In WordPress, a “post” is a normal entry, such as a blog entry or an article. Posts are always timestamped, and are sorted on the homepage in reverse chronological order. A “page” is very similar to a post, but does not have a timestamp and is not listed in any chronology on the site. Instead, a page is used for “static” or “evergreen” content such as your “About” or “Contact Us” page.
3) Creating a Post

2) Post Titles:
– Use title capitalization, all words in a title are capitalized, with the exception of “a”, “the”, “in”, “for”, “by”
– Always capitalize the first and last word
Examples:
Look Out for Identity Thieves
Sexploitation in the Hip-Hop Industry
3) Text WSIWYG “What You See is What You Get” editor
View the WordPress tutorial on its Visual Editor or view the PDF version.
4) Inserting an image
Click to view the WordPress Tutorial on images.
Upload your image using the “upload/insert” command in the upper left hand corner.
![]()
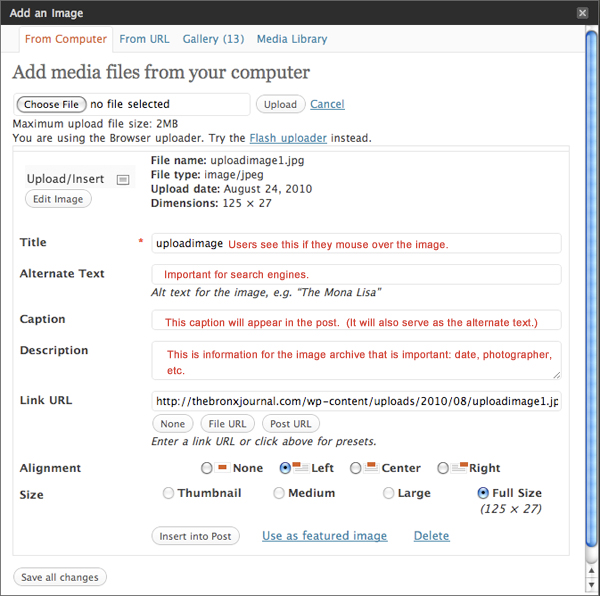
You will be given four choices: from URL, from the gallery, from the media library or from a local file on your desktop. To upload a new image, choose the last one.
If the file has already been uploaded, you can find it by looking in the media library. If you want to use an image that is not on TBJ, select URL and input that address.
You will be given several formating and labeling options.

– Alignment
Left: The image is aligned to the left and content flows around it
Center: The image is centered and content flows around it
Right: The image is aligned to the right and content flows around it
– Image size
If the image has been sized to the dimensions you want it, select “full size”. If it is larger image and you would like to display a smaller one, linking to the larger one, select medium, large, or thumbnail. (note: there may be some image distortion with the latter.)
– Image details
Title text is displayed as a tooltip (when a mouse is hovered over the image)
Caption is displayed directly underneath the image (will also serve as the alternate text.)
Link URL
This is what the image is linked to and what will show up in the window if someone clicks on it. Click the File URL button to link the image to its original, full-size version. Click the Post URL button to have the image linked to its attachment page. If you want it to link to a story, use that URL. If it is purely for the story layout with no link, click on “None.”
When finished choosing your image settings, click on the Insert into Post button.
5) Image sizes for TBJ
Posts:
800 pixels wide – full width
Featured image:
1500 pixels wide
Note: if you want it to be a featured image, you may have to tinker a bit with it to make it fit the vertical format.
5) Inserting YouTube video
To insert a YouTube video, you can grab the URL for the video at the top of the page and simply add it to the Visual mode of the post body. Or, you can choose the option “embed” and then you must paste the text into the HTML tab mode.
6) Adding audio
Use Soundcloud to embed audio.
7) Add a featured image
You need a featured image for the home page and landing page blurbs. You can choose one of the images from the story itself. In the right-hand column, towards the bottom you will see a link that is labeled “featured image.” Click this and select or upload an image. Note: for the home-page slider, the image should be 1000×400.
8) Add an excerpt
This is the text excerpt that will accompany the blurb. It should summarize the story. If you do not add this, WP will grab the first text that appears on the screen. The excerpt field is below the post.
9) Saving and previewing a post
In the right hand column of the site, there is a “Publish” section at top. At this stage, you will not be publishing, but should always — frequently — “Save Draft.” Once saved, you can “Preview” your site by clicking “Preview.”


No comments